Lab 5: Microscopy and Cells
Microscopy and Cells
Objectives
After completing this exercise, you should be able to:
-
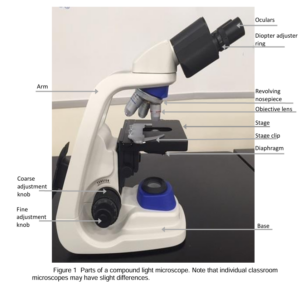
Identify the parts of a compound light microscope and describe the function of each part.
-
Use proper microscope technique to view slides.
-
Calculate total magnification of an image.
-
Create drawings that follow biological drawing guidelines.
-
Differentiate between prokaryotic and eukaryotic cells.
-
Identify organelles and other cell structures.
-
Use a dichotomous key to identify organisms.
Key Terms
| Term | Definition / Context |
|---|---|
| Cell Wall | Structural layer surrounding plant cells |
| Central Vacuole | Large, water-filled organelle maintaining turgor pressure |
| Chloroplast | Site of photosynthesis |
| Cyclosis (Cytoplasmic Streaming) | Movement of cytoplasm within a cell |
| Cytosol | Fluid portion of cytoplasm |
| Diaphragm | Regulates amount of light passing through specimen |
| Dichotomous Key | Tool for identifying organisms using choices |
| Eukaryote | Cell with a nucleus and membrane-bound organelles |
| Field of View | Circular area visible through the microscope |
| Mechanical Stage | Platform that supports and moves the slide |
| Nosepiece | Rotating part holding objective lenses |
| Nucleus | Control center of the cell |
| Objective Lens | Magnifies specimen (4x, 10x, 40x, 100x) |
| Oculars | Eyepieces (usually 10x magnification) |
| Parfocal | Ability to remain in focus when switching objectives |
| Plasma (Cell) Membrane | Selectively permeable barrier enclosing cell contents |
| Prokaryote | Cell lacking nucleus and membrane-bound organelles |
| Resolving Power | Ability to distinguish two close points as separate |
Introduction
The world around you teems with life—most of which you cannot see unaided. The macroscopic life visible to the naked eye is only a small portion of the planet’s biodiversity. Many organisms are microscopic and require specialized tools to be observed.
Microscopes allow scientists to visualize these organisms. In this lab, you will use a compound light microscope to explore the microscopic world.
Today’s focus is on eukaryotic cells, which contain a nucleus and membrane-bound organelles.
You (and most living organisms such as plants, fungi, protists, and animals) are eukaryotes—literally “true nucleus.”
In contrast, prokaryotic cells (e.g., bacteria) lack a nucleus and membrane-bound organelles.
Within eukaryotic cells, specialized structures called organelles perform essential functions:
-
Chloroplasts (in plants) enable photosynthesis.
-
Mitochondria generate most of the cell’s energy (ATP).
Figure 1. Parts of a Compound Light Microscope
Materials and Procedure
Materials
-
Compound light microscope
-
Lens paper
-
Clean slide and coverslip
-
Prepared slide: letter “e”
-
Zoea of crab slide
-
Volvox slide
-
Two toothpicks
-
DI water bottle
-
Dropper bottle with methylene blue stain
-
Elodea leaf
-
Drop of pond water
General Rules for Microscope Use
1. Preparing the Microscope
-
Plug in and turn on the light source.
-
Adjust the oculars (eyepieces) to match the distance between your eyes.
-
Use the diopter adjustment ring to compensate for differences in eyesight.
-
Clean all glass surfaces (oculars, objectives, condenser) before and after use with lens paper only—never paper towels.
2. Using the Microscope
-
Place the slide on the stage and secure it with the stage clip.
-
Ensure the scanning objective (4x) is in place.
-
Use the coarse adjustment knob to raise the stage close to the objective lens.
-
While looking through the oculars, slowly lower the stage until the specimen comes into view.
-
Refine focus using the fine adjustment knob.
-
Center your specimen before increasing magnification.
-
Switch to low power (10x), then high power (40x). Use only fine focus at 40x.
-
Adjust contrast using:
-
The diaphragm, or
-
The light dimmer switch.
-
Caution: Never use the coarse adjustment knob with the 40x lens—this can crack the slide or damage the lens.
Exercise 1 – The Letter “E”
-
View the prepared “letter e” slide under low power.
-
Compare the specimen’s position on the slide (naked eye) vs. the image seen through the microscope.
-
How do they differ? ____________________________
-
-
Move the slide so half of the “e” disappears from the field of view. Switch to low power without moving the slide. What do you observe now? ____________________________
-
Return to scanning power, center the “e,” and move through all magnifications.
-
Choose the best magnification for clarity.
-
Draw your “e” following the Biological Drawing Guidelines below.
Guidelines for Biological Drawings
-
Use white, unlined paper (two figures per page, one side only).
-
Each drawing must include:
-
Figure number (e.g., Figure 1)
-
Descriptive title
-
Total magnification (ocular × objective)
-
-
Example: Ocular (10x) × High Power Objective (40x) = 400x Total Magnification
-
Draw accurately and neatly using pencil only.
-
Label structures outside the field of view with straight connecting lines.
-
Do not add colors (stains vary and are not standardized).
Exercise 2 – Depth of Field: Thread Slide
Use a prepared thread slide with overlapping colored threads.
-
Focus under 4x, then move to 10x and 40x.
-
Observe that not all threads can be focused simultaneously.
-
As you adjust focus, different layers become clear—illustrating depth of field.
-
-
This concept helps interpret cell layer depth in tissues.
Exercises 3 and 4 – Copepod or Zoea of Crab and Protist (Volvox)
-
View the arthropod (copepod or zoea) slide, then the Volvox slide.
-
Follow the previous microscope steps.
-
Sketch each organism following biological drawing guidelines.
Exercise 5 – Elodea
Elodea is an aquatic plant (Genus name: Elodea).
Identify and label the following on your drawings:
-
Cell Wall – rigid outer boundary giving shape
-
Cell Membrane – pressed against the cell wall
-
Chloroplasts – small green spheres (site of photosynthesis)
-
Central Vacuole – large clear space filled with water and solutes
-
Cytosol – clear fluid portion of cytoplasm; look for cytoplasmic streaming (cyclosis)
Wet Mount Preparation
-
Place one Elodea leaf flat on a clean slide.
-
Add a drop of water.
-
Lower the coverslip at a 45° angle to reduce air bubbles (see Figure 3).
-
View at 400x total magnification.
-
Clean your slide and coverslip afterward.
Exercise 6 – Pond Water
-
Obtain a pond water sample with a pipette (include green algae and detritus).
-
Add 1–2 drops to a slide and place a coverslip.
-
Scan the slide systematically (see Figure 4) for organisms.
-
Draw two different organisms you find and note:
-
Type (protist, algae, etc.)
-
Movement or behavior
-
-
Clean all materials when finished.
Exercise 7 – Human Cheek Cells
This exercise involves biohazardous material. Follow all disposal instructions carefully.
-
Place one drop of water on your slide.
-
Add a small amount of methylene blue stain using a toothpick and mix.
-
Using a new toothpick, gently scrape the inside of your cheek.
-
Swirl the sample in the stained drop.
-
Add coverslip and view under microscope.
-
Identify and label:
-
Nucleus
-
Cell Membrane
-
Cytosol
-
Exercise 7 – Clean-Up Procedure
-
Dispose of toothpicks in the red sharps biohazard container.
-
Place slides and coverslips in the biohazard sharps container.
-
Use disinfectant spray and Kimwipes to clean microscope surfaces.
-
Clean glass areas with lens paper only.
-
Dispose of all contaminated materials in biohazard bins.
Do not use biohazard bins for regular trash.
Guidelines for Proper Microscope Care
| Checklist | Action |
|---|---|
| ☐ | Turn off and unplug the microscope. |
| ☐ | Clean all glass parts with lens paper. |
| ☐ | Clean stage with disinfectant. |
| ☐ | Set scanning objective (4x) in place. |
| ☐ | Lower stage completely. |
| ☐ | Coil power cord neatly. |
| ☐ | Show cleaned microscope to instructor before storage. |
Data and Drawings
| Figure | Draw in a Separate Paper | Total Magnification |
|---|---|---|
| Figure 1 | _______ | |
| Figure 2 | ___________________________________________ | _______ |
| Figure 3 | ____________________________________________ | _______ |
| Figure 4 | ____________________________________________ | _______ |
| Figure 5 | ____________________________________________ | _______ |
| Figure 6 | ____________________________________________ | _______ |
Review Questions
-
List several differences between plant and animal cells based on your observations.
-
Compare and contrast prokaryotic and eukaryotic cells.
-
Can you identify each cell type and its organelles observed in this lab?
-
Identify the parts of the microscope and describe their functions.
Licenses and Attribution
CC Licensed Content, Original:
-
This educational material includes AI-generated content from ChatGPT by OpenAI. The original content created by Dr. Zeinab Motawe from Hillsborough College is licensed under a Creative Commons Attribution-NonCommercial 4.0 International License (CC BY-NC 4.0).
-
All images in this textbook generated with DALL-E are licensed under the terms provided by OpenAI, allowing for their free use, modification, and distribution with appropriate attribution.
Other Licensed Content Included:
- Adapted with permission from BioScience I Laboratory Manual by Jamie Colson-Moon and Denise Bristol. Per request from these original authors, this content is now licensed (CC BY-NC-SA).